Appearance is one of the most important aspects to consider when developing an app. Most users are quick to get carried away by what they see. If an app has an attractive and intuitive design, it is much more likely to be successful than an app with a clunky and impractical design, even if the latter is more functional. Although many believe that the appearance of the applications is the work of a graphic designer, the truth is that it is largely a function of the developer, who is in charge of selecting the fonts, the size, the colors and the alignment of the objects, among other things. Unfortunately, this is a tedious job that requires a lot of skills and experience. This would be fixed if CSS could be included in a native mobile app. CSS is a complementary mechanism to HTML that helps developers tell the projects how and where to display information.
Knowing how to integrate CSS into native apps is a must-have skill for any developer who wants their app to look good with little effort. This post clearly and concisely explains how to integrate CSS into the iOS operating system.

What is CSS (as use in ios app)
The CSS Reference app is specially designed for iOS and provides convenient access to all W3C Cascading Style Sheets (CSS) properties, pseudo-classes and pseudo-elements, including syntax, possible values for each property, usage notes and the full content. Show sample code.
The HTML sample code can be edited and redisplayed (using the built-in browser), allowing the HTML or CSS developer to see how changes to various values and properties will appear without going into a web based development environment.
The included color picker provides CSS color in RGB and hexadecimal format, based on the user-selected CSS color name, CSS Web Safe Color RGB or hexadecimal values, or in user-specified discrete values.
Why Use CSS In Native Apps?
CSS is used to define styles for native apps and web pages, including layout, design, and display variations for different devices and screen sizes.
CSS Example
- body {
- background-color: lightblue;
- }
- h1 {
- color: white;
- text-align: center;
- }
- p {
- font-family: verdana;
- font-size: 20px;
- }
CSS Syntax
A CSS rule consists of a selector and a declaration block.
CSS Syntax
The selector points to the HTML element that you want to format.
This block contains one or more declarations, separated by semicolons.
Each declaration contains a CSS property name and value, separated by a colon.
Multiple CSS declarations are separated by semicolons, and declaration blocks are surrounded by curly braces.
Example
In this example, all <p> elements are center-aligned, with a red text color:
- p {
- color: red;
- text-align: center;
- }
Example Explained
p is a selector in CSS (it points to the HTML element you want to style: <p>).
color is a property, and red is the property value
text-align is a property, and center is the property value
Use CSS In iOS Native Apps
Both Android and iOS do not support writing CSS directly in the native app code, so there is only one way to integrate it into the app.
MCSS (Mobile Cascade Style Sheet)
Developing native mobile applications can be a process that requires a large investment of time and money, which is doubled if the application is built in two different programming languages (normally SWIFT & JAVA, corresponding to iOS and Android). However, there is an alternative where developers can reduce the time and cost (+40%) of developing a native application on Android and IOS; MCSS.
MCSS is similar to CSS in many ways. MCSS allows you to create components and make changes and updates to one, two, or more views of an application in production, simultaneously, and without the need to write additional code. Shares over 70% of CSS instructions, making it easy for experienced CSS developers to create complex graphical layouts in no time. Also, it can run in any native IDE like Xcode, Android Studio, Eclipse and more. In this way, developers have many options that facilitate the development of applications.
Unlike apps built with web views, MCSS provides the ability to identify native components with classes and IDs and apply style rules to all components within the app on Android and IOS simultaneously.
What is MCSS
MCSS is a framework developed in SWIFT and JAVA that allows you to apply style sheets to native iOS and Android applications while maintaining the same structure, design and aesthetics on all platforms.
MCSS Characteristics
MCSS allows to change all components within an application or group of components by using selectors with a single line MCSS declaration
MCSS saves a lot of work. You can control the layout, design, and aesthetics of multiple objects and views and simultaneously on Android and iOS.
MCSS describes how native mobile components are rendered on Android and iOS devices
MCSS style sheets can be stored locally in the original project or referenced by a URL, allowing real-time changes and updates to app views for end users (no need to push them to the stores for users to download). users update their apps for cosmetic changes)
MCSS makes it possible to create complex native graphics and components within a native app and simultaneously on Android and iOS by using classes and identifiers (like CSS)
MCSS can be installed and used in Xcode, Android Studio, Eclipse and more
Why MCSS?
MCSS is built on SWIFT/JAVA which allows style sheets to be applied simultaneously to native iOS and Android apps while maintaining the same structure, design, and aesthetics across platforms.
MCSS saves a lot of work. You can control the layout, design, and aesthetics of multiple screens simultaneously and simultaneously on Android and iOS.
How MCSS works
MCSS describes how to display views and various components on mobile devices. MCSS saves a lot of work and time, you can control the design of multiple views at once.
![]()
MCSS is not a hybrid technology, applications developed with MCSS remain native, you can use your favorite IDE, XCode, Android Studio, Eclipse, etc. Simply plug this powerful framework into your project (how to install MCSS in your app project) and if you do a short deployment, your app will adopt the layout described in the .mcss files.
Once you have created a .mcss file that is located at an external URL or stored locally in your project, the Framework applies the instructions in your .mcss file to the various views and components. Just like CSS it works on an HTML website.
- *{
- font-name: Menlo-Regular;
- }
- label{
- -mcss-min-font-scale: 0.2;
- font-name: Menlo-Bold;
- }
- body.-popup{
- background-image: linear-gradient(to bottom, purple 0%, #5f009c 100%);
- }
- label.message-error{
- background-color: #eb4a26;
- color: white;
- }
- label.title{
- color: #89ff00;
- }
- button{
- background-color: transparent;
- color: #006293;
- font-name: Menlo-Bold;
- border: none;
- box-shadow: #ffffff55 1 1 5;
- }
- textfield,textview{
- background-color: black;
- color: white;
- border-radius: 0px;
- border: 1px #89ff00;
- }
- switch,activityindicator,stepper,segmentedcontrol,slider,pagecontrol,picker,datepicker{
- color:yellow;
- }
- stepper,segmentedcontrol{
- border:1px #89ff00;
- border-radius:50%;
- }
- slider,pagecontrol,switch{
- background:#ccc;
- }
When a .mcss file is located at an external URL, it displays the various views and components of a mobile app without submitting a new version of the app to the app store; simply editing the .mcss file will automatically update the app the next time a user opens the app.
This eliminates the hassle of submitting your app to the store and waiting for review and approval for a cosmetic change to your app. Users will see the changes in near real time.
How to start
- Register with MCSS (login or register).
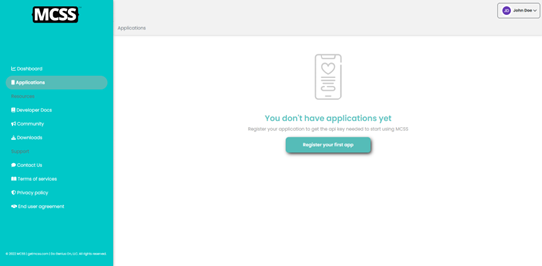
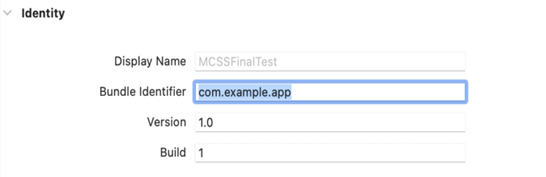
- Fill out the form to register a new app, select the platform (iOs or Android), and provide the bundle ID used in your app project.
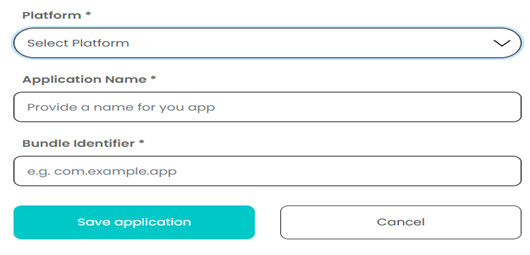
- Click save to register your app, copy the provided app key to paste it into your project

- Download and place MCSS in project
- Go to your application project and initialize MCSS with the received application key
import MCSSLib
func application(_ application: UIApplication,
didFinishLaunchingWithOptions launchOptions: [NSObject: AnyObject]?) -> Bool {
...
MCSS.shared.initialize(withKey: "Application_Key")
...
}
Identify the components in your application views by adding classes and ids as you like, it is important to create the MCSS Selector rules (How to create an id plan)
iOS: Use the frontend builder editor to easily add classes (separated by commas) and an identifier to your app's components.

Or do it programmatically using the MCSS extended properties for each UIKit component
import MCSSLib
override func viewDidLoad(){
...
view.mcssId = "main-container"
loginButton.mcssId = "login-btn"
loginButton.mcssClasses = "primary,rounded"
...
}
To use your own app layout, simply create a .mcss file adding a list of selectors and rules, as you normally do with CSS for HTML (learn the MCSS syntax). You can connect the MCSS file via URL or place it locally in your project (how do you add .mcss files to your project), if you want you can use an MCSS theme (themes available from MCSS)
iOS: In the application:didFinishLaunchingWithOptions: method, call the function to add your .mcss file, after MCSS initialization:
import MCSSLib
func application(_ application: UIApplication,
didFinishLaunchingWithOptions launchOptions: [NSObject: AnyObject]?) -> Bool {
...
MCSS.shared.initialize(withKey: "Application_Key")
MCSS.shared.useTheme(named: "moon")
MCSS.shared.addStylesheet(fromURL: "https://www.myappcloud.com/files/style.mcss.css")
MCSS.shared.addStylesheet(fromFile: "style.mcss.css")
...
}
Execute the apply method in all views of your application.iOS: On all ViewControllers, override the viewDidLayoutSubviews method and call the app method here. MCSS will edit all components from parent to child. You can also send a particular component as a parameter and/or call the apply method at a later point in the views execution.
import MCSSLib
override func viewDidLayoutSubviews(){
...
MCSS.shared.apply(in: self)
...
}
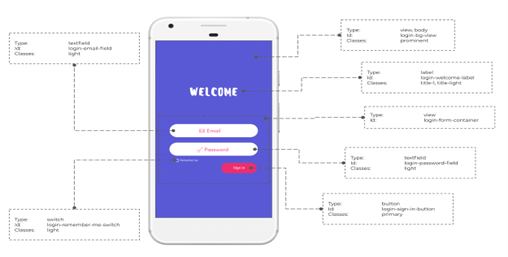
Identification plan
MCSS is designed to add properties to mobile application components, which must be registered in one or more MCSS files, these files contain rules grouped in selectors like CSS for websites, these selectors refer to the components using the type names , classes and identifiers. .
MCSS automatically detects the component type (e.g. button, text field, screen, see list of MCSS supported components), but the developer must provide the classes and IDs of the various components in the application.
How to create an identification plan
Making a good identification plan is the foundation of a successful MCSS Application Design. the more components you identify, the more flexible your application can be. It is very important if you are going to edit your application via URL when it is in production.
You don't need to identify all the components, but be sure to identify the components needed to create a dynamic layout (because when you launch your app, you need to update your app to identify new components, but not to update your mcss-edit files).
After selecting the components you want to identify, edit the following properties for each:
MCSS Id: Assign a unique name to the component here to create rules in your files that refer exclusively to this component.
Example: If you add the name login button to your component, you can create a selector in the MCSS file like this #loginbutton{...}. All lines in this selector will only edit this element.
MCSS Classes: Specify one or more classes, separated by commas, to identify a component as part of a group.
Example: If you add the primary class to a UIButton, you can create a button.primary{...} selector to reference all components that are buttons and have the primary class. You can add more than one class to ensure that the component gets the properties assigned to each class using selectors, for example. primary, rounded
MCSS Fixed: The default value for this property is false, when set to true the component cannot be accessed via MCSS. Use this property when you have a component that you want to keep its original layout, regardless of the rules in the MCSS files.
We recommend that you create a handle diagram for each view in your application, and then go to the IDE and edit the MCSS properties for the application components.
How to identificate components in Swift (iOS)
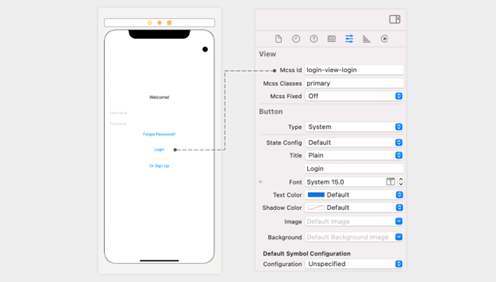
Method 1: Using the interface Builder
You can easily identify your components by going to your xib or storyboard file and clicking on the component you want to edit, in the inspector pane (usually on the right) you can get the MCSS properties (MCSS ID, MCSS Classes, MCSS Fixed).
Method 2: Programmatically
Go to the ViewController you want to edit, import the MCSSLib and, in the ViewDidLoad method, use the UIVIew extended properties to access the MCSS properties on the desired components.
import MCSSLib
func viewDidLoad() {
...
self.loginButton.mcss.id = "login-button"
self.loginButton.mcss.classes = "rounded,primary"
self.registerButton.mcss.classes = "link"
view.mcss.id = "login-bg-view"
self.bottomBar.fixed = true
...
}
How to migrate an app to MCSS?
If you have an existing application you can integrate it into MCSS, the process is very simple.
For a native mobile app currently in production, MCSS integration is a smooth, simple, and intuitive process.
1. Open your application project in your preferred Native IDE
If you have a quick request, open your project in Xcode.
If your app is developed for Android, you can use an IDE like Android Studio, Eclipse, Visual Studio, or any other.
2. Download the MCSS Framework
On iOS, the recommended option for incorporating the MCSS Framework into your project is to use the Swift Package Manager
Method 1: Manual Installation
Download MCSSLib.xcframework Framework and UIView+MCSS.swift file class from https://github.com/getmcss/MCSS-Swift or use the command:
git clone https://github.com/getmcss/MCSS-swift
Both files can be in the source folder.
Drag MCSSLib.xcframework and UIView+MCSS.swift into your project and check the option to copy elements if necessary.
Go to embedded content and mark MCSS as embedded and sign.
Method 2: Swift Package Manager
In Xcode, select File > Swift Packages > Add Package Dependency.
Follow the prompts using the Github URL:https://github.com/getmcss/MCSS-Swift.git and a minimum semantic version of v1.0.0
https://github.com/getmcss/MCSS-Swift.git
3. Identify your components
MCSS provides ways to easily add classes and IDs to the various components of your application; it is equivalent to the identifiers and classes in an HTML file.
4. Write the MCSS Rules to create the desired design
Like CSS, MCSS allows the developer to create style sheets that define aesthetic rules that are applied to the components in the views of the application.
Since the MCSS syntax is derived from the original CSS syntax, if you have a website that looks the same as your application, you can take your website's CSS files and modify them.
MCSS Syntax
MCSS is a set of rules consisting of a selector and a declaration block with some properties and values: selector{property1:value1; property2:value2;}.
Most of the MCSS syntax is inherited from CSS syntax, with the main difference being that selector names target native mobile app components such as buttons, text fields, views, tables, and others.
Selectors
Selector is the part of the rule defined to refer to the component(s) in a view that is affected by the properties of the block. These are different types of selectors:
Simple Selectors
Grouping Selectors
Combinator Selectors
Universal Selector
Components
Naming components in MCSS are significantly different from CSS for HTML, as they are geared towards referring to the different components in a mobile view.
Available component names for iOS:
The name of the components in MCSS will be the same name as the UIKit classes, but if the UI prefix is omitted, the word rendering is also omitted in some cases.
iOS Component Names:
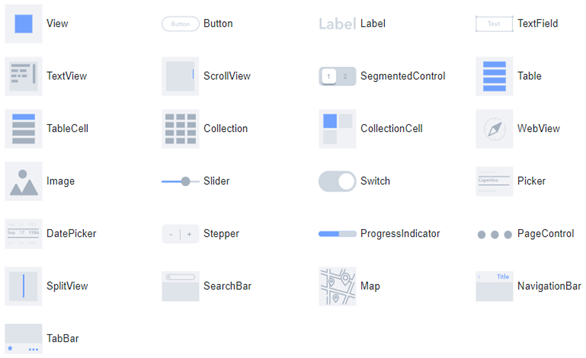
MCSS can edit any item in your views, even if it's not in the list or is a custom item. Unclassified components are treated as views, but have access to most MCSS properties.
Example:
button{...};
tablecell,collection cell{...};
5. That’s All, MCSS Makes it easy for you!
Depending on the rules declared in your .mcss files, the MCSS layout can be combined or replaced with your existing layout. You do not need to delete the current application design, as MCSS will work to simplify the process for you.
Benefits of using CSS in native iOS app development:
Millions of registered credit card owners are just a click away.
Xcode, Interface Builder, and the Cocoa Touch framework make for a pretty nice development environment.
You can access all the great hardware features of the device.
Drawbacks of native iOS app development:
You have to pay to become an Apple developer.
You are at the mercy of Apple's approval process.
You have to develop with Objective-C.
You have to develop on a Mac.
You can't post bug fixes in a timely manner.
The development cycle is slow and the testing cycle is limited by the limitations of the App Store.